
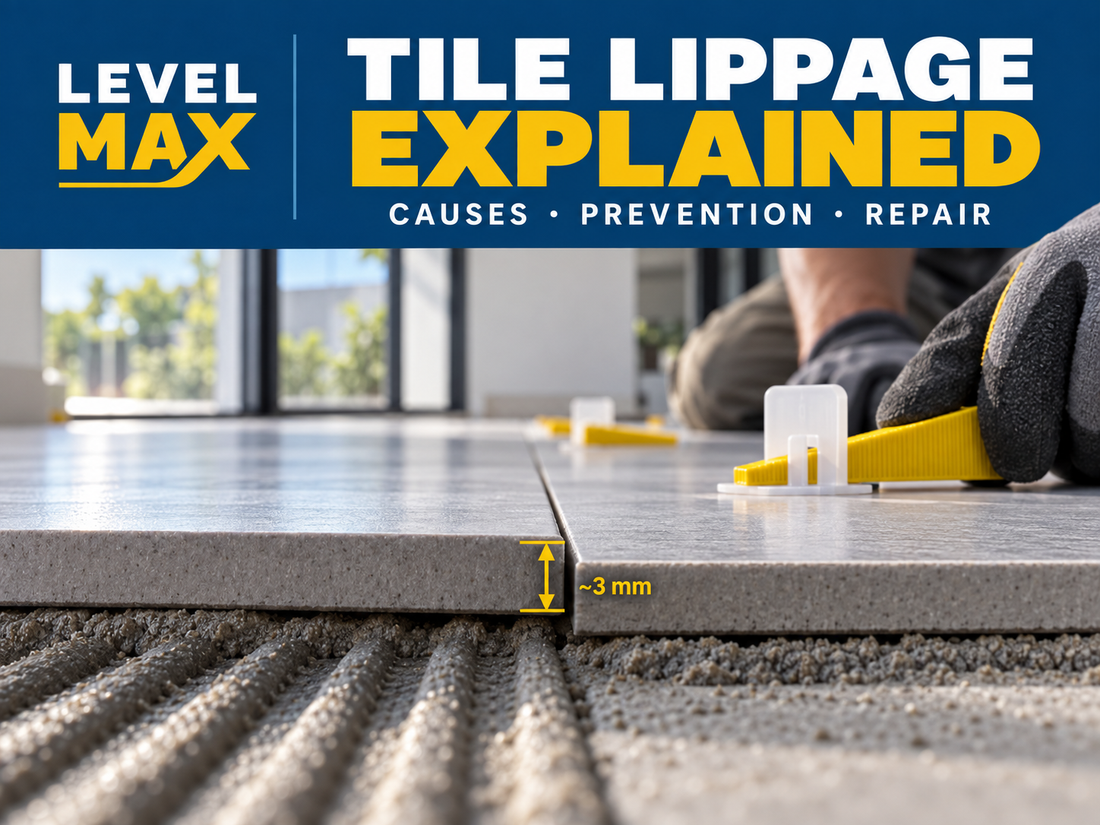
Tile Lippage Explained: Causes, Prevention and How to Fix It
Share
A newly tiled floor may look perfectly aligned from a distance, yet feel uneven when you walk across it or run your hand over the joints.
This difference in height between the edges of adjacent tiles is known as tile lippage.
Minor variations may result from allowable tile manufacturing tolerances, surface texture, tile curvature and installation conditions. Excessive lippage, however, can affect the appearance, cleanability and usability of a tiled surface.
It may also create:
- Visible shadows along grout joints
- Uncomfortable edges underfoot
- Trip or accessibility concerns
- Areas that catch dirt and cleaning equipment
- Chipped tile edges
- An uneven reflection under directional lighting
- Customer complaints after project handover
Preventing tile lippage begins long before the levelling clips are installed. Substrate preparation, tile inspection, layout, adhesive selection and installation technique all affect the final result.
What Is Tile Lippage?
Tile lippage is the difference in elevation between the edges of two adjacent tiles.
If one tile edge sits higher than the next, a step is created across the grout joint. This difference may be very small, but it can become visually obvious when light travels across the surface.
Lippage should not be confused with:
- A floor that is consistently sloped
- An entire wall that is out of plumb
- Uneven grout depth
- Textured or hand-finished tile edges
- Tile thickness variation
- A designed fall towards a floor waste
A bathroom floor, for example, may need to slope towards the drain while still maintaining good alignment between adjacent tile edges.
The objective is not always to create a perfectly level surface. It is to create a correctly aligned tiled finish over a substrate that meets the project’s required plane, slope and drainage design.
Is Some Tile Lippage Normal?
A perfectly flush transition between every tile edge is difficult to guarantee because tile manufacturing and installation both involve tolerances.
The finished result may be affected by:
- Tile facial dimensions
- Edge straightness
- Surface texture
- Tile warpage
- Grout-joint width
- Tile pattern
- Substrate flatness
- Installation workmanship
There is no single lippage number that should be applied to every tile installation without considering these variables.
Acceptable tolerances should be assessed against:
- The current project specification
- Applicable Australian Standards
- The tile manufacturer’s tolerances
- The installation method
- The intended use of the area
- Grout-joint width
- Tile warpage
- Accessibility requirements where applicable
A narrow grout joint can make the same height difference feel more severe because the transition occurs over a shorter distance.
Before work begins, the expected finish should be discussed with the builder, designer, tiler and client—especially when large-format, rectified or highly reflective tiles are specified.
What Causes Tile Lippage?
Tile lippage is rarely caused by one factor alone. It often results from a combination of tile shape, substrate condition, adhesive application and installation technique.
1. An Uneven Substrate
One of the most common causes of tile lippage is an uneven floor or wall.
If the substrate contains high spots, hollows, ridges or sudden changes in plane, the tiles will tend to follow those variations. The installer may try to compensate by adding extra adhesive under individual tiles, but this can create an inconsistent adhesive bed and make alignment more difficult.
Large-format tiles are particularly sensitive because they bridge a greater distance across the substrate. A variation that may be manageable beneath a smaller tile can become much more noticeable beneath a long tile.
The substrate should be checked before adhesive is mixed, using suitable equipment such as:
- A long straightedge
- Laser level
- Spirit level
- Appropriate measuring wedges
- Surveying equipment for larger commercial areas
Where correction is required, a product such as LEVELMAX ProFlow Self-Levelling Compound can help create a smoother and more consistent base over approved, properly prepared substrates.
A self-levelling compound should be used to prepare the substrate—not as a substitute for checking levels, falls, joints or moisture conditions.
2. Tile Warpage
Tiles are not always perfectly flat.
During manufacturing and firing, porcelain or ceramic tiles may develop a slight curve. This is commonly called warpage or bowing.
A tile may be:
- Higher through the centre
- Lower through the centre
- Curved along its length
- Twisted from corner to corner
- Slightly different from other tiles in the same batch
Long plank tiles and some large rectangular tiles can make this curvature more noticeable.
If curved rectangular tiles are installed in a 50% brick-bond pattern, the high centre of one tile may sit beside the lower ends of the neighbouring tiles. This can exaggerate lippage even when the installer is working carefully.
Before installation:
- Inspect tiles from multiple boxes.
- Place representative tiles face-to-face.
- Check for rocking, gaps and visible curvature.
- Confirm the manufacturer’s recommended offset.
- Dry-lay part of the pattern where necessary.
- Discuss unavoidable product variation before installation begins.
A levelling system may reduce edge movement while the adhesive cures, but it cannot permanently straighten a significantly warped tile.
3. Incorrect Adhesive-Bed Thickness
An inconsistent adhesive layer can create different finished tile heights.
This may happen when:
- The wrong trowel size is used
- The trowel angle changes continuously
- Adhesive is applied too thinly
- Excess adhesive is used to fill deep hollows
- Old adhesive ridges begin to skin over
- Individual tiles receive different amounts of back-buttering
- The substrate was not flattened before installation
Adhesive should be applied in a controlled and repeatable manner. The trowel size should suit the tile dimensions, substrate and required coverage.
Using more adhesive is not always the solution. Excessive thickness can allow tiles to move, settle or tilt while the adhesive is curing.
4. Poor Adhesive Coverage
Tile lippage is a surface-alignment issue, but it may also be connected to poor adhesive transfer.
If one section of a tile is adequately supported while another rests over a void, the tile may rock or settle unevenly. This may create both lippage and a weak installation.
Good adhesive transfer requires:
- A clean, prepared substrate
- Adhesive spread within its open time
- Consistently combed ridges
- Directional trowelling
- Correct tile placement
- Appropriate back-buttering
- Periodic lifting of tiles to inspect coverage
Avoid applying adhesive in isolated spots. Spot bonding creates unsupported voids and makes it difficult to control the tile surface accurately.
LEVELMAX ProBond C2TE S1 Tile Adhesive provides extended open time, non-slump properties and S1 deformability for approved wall and floor tile installations.
For more information about its classification, read our guide to C2 vs C2S1 tile adhesives.
5. Adhesive Applied Beyond Its Open Time
After adhesive is spread, it remains suitable for tile placement for a limited period.
Hot weather, direct sunlight, wind, absorbent substrates and low humidity can shorten the practical open time. If the surface begins to form a skin, the tile may not properly compress the adhesive ridges.
This can lead to:
- Reduced adhesive transfer
- Uneven support
- Difficulty adjusting tile height
- Hollow areas
- Future debonding
Do not spread more adhesive than can be tiled within the available working period.
If adhesive has skinned over, remove it and apply fresh material. Do not attempt to reactivate it by adding water or simply trowelling over the surface.
6. Incorrect Trowelling Direction
Adhesive ridges should normally be combed in a consistent direction.
When the tile is moved perpendicular to the ridges during placement, air can escape more effectively and the ridges can collapse into a more continuous bed.
Random curves, crossed ridges and circular trowelling can trap air and create inconsistent support beneath the tile.
For large-format tiles:
- Key a thin layer of adhesive into the substrate.
- Comb additional adhesive in one direction.
- Back-butter the tile where required.
- Place the tile while the adhesive is fresh.
- Move it across the direction of the ridges.
- Check coverage regularly by lifting a tile.
A levelling clip cannot compensate for uncollapsed adhesive ridges or inadequate transfer.
7. Incorrect Use of a Tile Levelling System
Tile levelling systems are useful, but their name can create a misunderstanding.
A tile levelling system helps align adjacent tile edges. It does not level or flatten the underlying floor.
If the substrate is uneven, forcing tiles into alignment with clips may:
- Pull one tile away from the adhesive bed
- Create voids
- Reduce adhesive transfer
- Place excessive stress on the tile edge
- Break clips prematurely
- Cause tiles to move after clip removal
The clips and wedges should apply enough pressure to control alignment—not enough to distort the installation.
The LEVELMAX Tile Levelling Base Clips help maintain consistent spacing and support edge alignment between tiles.
They are designed to be used with LEVELMAX Tile Levelling Wedges, which apply controlled pressure while the adhesive sets.
For projects requiring an adjustable reusable option, the LEVELMAX Reusable T Leveller provides screw-adjusted height control between adjacent tiles.
8. Narrow Grout Joints
Narrow grout joints can make lippage more visible and more noticeable underfoot.
A wider joint creates a more gradual visual transition between tile edges. A very narrow joint makes any difference in height appear sharper.
The grout-joint width should take into account:
- Tile size variation
- Tile warpage
- Whether the tile is rectified
- Installation pattern
- Manufacturer recommendations
- Project specification
- Applicable installation requirements
Rectified tiles allow more consistent joint widths, but “rectified” does not mean perfectly flat or dimensionally identical.
9. Inappropriate Tile Layout
Layout affects how neighbouring tile edges meet.
A pattern that places the most curved part of one tile beside the lowest part of another will exaggerate lippage.
This is especially common with:
- Long timber-look plank tiles
- Rectangular large-format tiles
- 50% brick-bond patterns
- Narrow grout joints
- Strong directional lighting
A smaller offset may reduce the difference between adjacent tile edges. Always review the tile manufacturer’s pattern and offset recommendations.
Dry-laying a sample area can reveal potential lippage before the adhesive is applied.
10. Tiles Moving While the Adhesive Sets
Tiles may shift after they have been aligned.
Possible causes include:
- Adhesive mixed with too much water
- Incorrect product selection
- Excessive adhesive thickness
- Foot traffic before setting
- Vibration from nearby construction
- Heavy tiles on walls
- Levelling devices removed too early
- Adjustment after the working time
A non-slump adhesive can help reduce movement, particularly on wall installations. However, the tiles still need to remain undisturbed until sufficient strength has developed.
Read How Long Should Flooring Adhesive Cure? to understand the difference between open time, working time, setting and full cure.
11. Poor Surface Preparation
Dust, weak laitance, paint, curing compounds, grease and loose material can prevent the adhesive from bonding evenly.
An absorbent substrate may also draw water from cementitious adhesive too quickly, reducing practical working time and affecting consistency.
Correct preparation can include:
- Mechanical cleaning
- Removal of contaminants
- Repairing cracks and weak areas
- Moisture assessment
- Flattening the surface
- Applying a compatible primer
- Allowing each preparation layer to dry or cure
LEVELMAX Primer X Concentrate helps regulate substrate absorption and improve adhesion before approved cement-based preparation products are applied.
Our Primer vs No Primer guide explains why priming should be treated as part of the complete installation system rather than an optional shortcut.
Why Is Lippage More Noticeable With Large-Format Tiles?
Large-format tiles reduce the number of grout joints and can create a clean, premium finish. At the same time, their size makes substrate and tile variations more difficult to absorb.
A large tile:
- Bridges more of the substrate
- Requires a flatter installation plane
- Can be more difficult to bed evenly
- May require back-buttering
- Is harder to adjust once placed
- Can magnify tile curvature
- Requires careful control of adhesive coverage
As tile dimensions increase, the quality of substrate preparation becomes more important.
Attempting to correct major surface variation with tile adhesive during installation can slow the work and produce an inconsistent result. It is usually more controlled to prepare the floor properly before tiling begins.
How to Prevent Tile Lippage
Step 1: Inspect the Substrate
Use an appropriate straightedge or laser to identify high spots, depressions and changes in plane.
Mark problem areas before applying primer or adhesive.
Step 2: Correct the Surface
Mechanically reduce high spots where appropriate and repair low areas using a compatible preparation system.
For suitable floor substrates, use LEVELMAX ProFlow with the specified preparation and priming process.
Step 3: Inspect the Tiles
Check tiles from multiple boxes for thickness variation, curvature, twist and edge condition.
Do not wait until several rows have been installed to identify a batch issue.
Step 4: Plan the Layout
Dry-lay representative tiles and check the selected offset, grout-joint width and visual alignment.
Pay particular attention to doorways, floor wastes, transitions and areas exposed to low-angle lighting.
Step 5: Select the Correct Adhesive
Choose an adhesive that suits:
- The tile type
- Tile dimensions
- Substrate
- Internal or external use
- Wet-area conditions
- Expected movement
- Required open time
LEVELMAX ProBond is a flexible, non-slump C2TE S1 adhesive designed for approved ceramic, porcelain, stone and mosaic applications.
Step 6: Use the Correct Trowel
The trowel must create enough adhesive to achieve the specified coverage without producing an unnecessarily thick bed.
Maintain a consistent trowel angle and comb the ridges in one direction.
Step 7: Check Adhesive Transfer
Periodically lift installed tiles and inspect the back.
Do not assume coverage is adequate because adhesive is visible around the edges.
Step 8: Use Levelling Clips Correctly
Place the correct number of clips for the tile size and configuration. Insert wedges gradually and apply even pressure.
Do not overtighten the system or use it to pull a tile across a major substrate depression.
Step 9: Recheck the Surface Continuously
Use a straightedge and visual inspection throughout installation.
It is easier to correct one tile while the adhesive is fresh than to repair an entire cured floor.
Step 10: Protect the Installation
Restrict traffic and allow the adhesive to set before removing clips, grouting or permitting other trades to enter the area.
Can a Tile Levelling System Eliminate Lippage?
A tile levelling system can significantly improve edge alignment, but it cannot guarantee a lippage-free installation by itself.
It cannot correct:
- A severely uneven substrate
- Excessively warped tiles
- Incorrect adhesive coverage
- An unsuitable tile pattern
- Inadequate grout-joint width
- Incorrect trowel selection
- Adhesive used outside its open time
- Structural movement
- Poor workmanship
The best results come from combining flat substrate preparation, suitable adhesive, correct trowelling and controlled use of the levelling system.
How Do You Check Tile Lippage?
Lippage should be assessed across the grout joint between adjacent tiles—not across a large section of the floor.
Useful inspection methods include:
- Visual inspection under normal lighting
- A suitable straightedge
- A calibrated wedge or feeler gauge
- Comparison at multiple grout joints
- Checking before and after grout installation
- Recording the tile type and joint width
Lighting conditions matter.
Strong natural light travelling across a glossy tiled surface may create shadows that make small variations appear more severe. Inspection should consider both measured differences and the normal conditions in which the finished room will be used.
Can Tile Lippage Be Fixed After Installation?
The repair depends on the severity, cause and adhesive condition.
Before the Adhesive Sets
If excessive lippage is found while the adhesive is still workable:
- Remove the affected tile.
- Inspect the adhesive coverage.
- Remove or redistribute fresh adhesive as appropriate.
- Confirm the substrate condition.
- Reapply fresh adhesive if required.
- Reinstall and realign the tile.
- Recheck the surrounding tiles.
Do not continue forcing the tile down if doing so removes necessary adhesive from beneath it.
After the Adhesive Has Cured
Once the adhesive has cured, the affected tile may need to be removed and replaced.
This can involve:
- Removing the grout around the tile
- Breaking or lifting the tile carefully
- Protecting adjacent tiles
- Removing cured adhesive
- Reassessing the substrate
- Installing a replacement tile
- Regrouting after curing
Grinding down a porcelain or ceramic tile edge is generally not an appropriate cosmetic solution. It may damage the finish, change the appearance or create a sharp edge.
If lippage is widespread, replacing individual tiles may not resolve the underlying substrate or layout problem. The full area should be assessed before repairs begin.
Tile Lippage Prevention Checklist
Before and during installation, confirm that:
- The tile batch has been inspected.
- Tile warpage and thickness variation have been checked.
- The substrate has been assessed for flatness.
- Required falls and drainage have been confirmed.
- High and low areas have been corrected.
- The substrate is clean, sound and properly primed.
- The installation pattern suits the tile.
- Grout-joint width is appropriate.
- The selected adhesive suits the complete system.
- The correct trowel is being used.
- Adhesive ridges are combed consistently.
- Tiles are installed within the adhesive’s open time.
- Back-buttering is completed where required.
- Adhesive coverage is checked regularly.
- Levelling clips are correctly spaced.
- Wedges are not overtightened.
- Tile alignment is checked continuously.
- The finished area is protected during curing.
Final Thoughts
Tile lippage is not simply a problem solved by adding more clips.
The quality of the finished surface depends on the complete installation process:
tile inspection, substrate preparation, layout planning, adhesive selection, adhesive coverage, alignment and curing.
Tile levelling clips and wedges are valuable tools for maintaining alignment between neighbouring tiles, but they work best over a properly prepared substrate with a consistent adhesive bed.
LEVELMAX offers a coordinated system for professional tile installation:
- ProFlow Self-Levelling Compound for preparing suitable uneven floor substrates
- Primer X Concentrate for compatible surface preparation systems
- ProBond C2TE S1 Tile Adhesive for approved wall and floor tile installations
- Base Clips and Levelling Wedges for consistent spacing and edge alignment
- Reusable T Levellers for adjustable, reusable height control
Preparing the surface correctly before the first tile is placed is usually faster and less expensive than repairing excessive lippage after the adhesive has cured.
FAQ
What is tile lippage?
Tile lippage is the difference in height between the edges of two adjacent tiles. Excessive lippage can affect appearance, cleanability, comfort and accessibility.
What is the main cause of tile lippage?
Common causes include an uneven substrate, tile warpage, inconsistent adhesive thickness, poor adhesive coverage, inappropriate layout and incorrect use of levelling clips.
Can a tile levelling system fix an uneven floor?
No. A levelling system aligns adjacent tile edges but does not flatten the underlying substrate. High and low areas should be corrected before tiling.
Why do large-format tiles have more lippage?
Large tiles bridge a greater area of the substrate and may make tile warpage or surface variation more visible. They require careful substrate preparation and adhesive coverage.
Does back-buttering prevent tile lippage?
Back-buttering can improve adhesive contact and help create consistent support, but it does not correct a severely uneven substrate or significantly warped tile.
Can excessive tile lippage be repaired?
If identified while the adhesive is fresh, the tile may be lifted and reset. Once the adhesive has cured, the affected tile will usually need to be removed and replaced.
Should tile adhesive be used to level the floor?
Tile adhesive may accommodate limited variations within its specified application thickness, but it should not generally be used to correct major substrate unevenness.
Do narrow grout joints make lippage worse?
Narrow joints can make the same height difference look and feel more severe because the transition between adjacent tiles occurs over a shorter distance.
Next post
C2 vs C2S1 Tile Adhesives: What Is the Difference?
Updated on 23 September 2026